Friday 28 September 2012

Repairing the Enterprise-C (part 1)

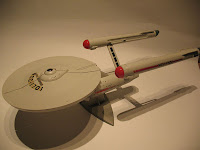
I've already posted pictures of the Enterprise's damaged saucer. Now I'm starting my first attempt at repairing it.
I'm not as ambitious to think I can restore it to a point where you won't notice it was damaged, but hopefully the result will be acceptable and you won't immediately see that several square inch of plastic was missing.
Luckily, the damage is on the underside, so you'll have to pick up the model to find it.


My best chance of repairing the damage is making a mold from a section that's intact and has the same surface detail, i.e. the other side of the saucer. I covered this liberally with liquid latex and let this dry for 2 days. (1 day is probably enough, but I didn't have time to work on it anyway)


I then carefully removed the latex from the model, but this stuff is quite resilient, so you don't need to be too carefull. The detail in the mold is better than I dared expect.

Wednesday 26 September 2012

Babylon 5 : Starfury

One of my works in progress is a Starfury Mk1 from the Sci-Fi show "Babylon 5". The model was partly assembled, but then discontinued.


The fit of most parts is terrible and requires heavy use of putty and sanding. This is the first time I'm using putty, but as you can see on the pictures, a lot of it is needed to fill all the gaps. (The instructions even suggest where you should use it)
Some of the gaps are difficult to sand, teaching me to do this one step at a time and not wait until it's almost fully assembled.


Saturday 22 September 2012

Masking with Latex

Because a big piece is missing on my Enterprise-C, I bought some liquid latex and hard plaster to make an attempt at making a mould and building a replacement part for it.

I have yet to start the attempt at making the mould, but today I fiddled around with the Latex, just to see how it handles and behaves on a model. I put some of it on some left-over sprue and covered a) a big piece of it with a thick layer, and b) several small protrusions to see if it removes easily.

(Normally, I'd prefer to use silly putty, as many modellers do, but - here in Belgium - I have yet to find it in a store. I refuse to pay $20-$30 shipping costs for a $2 egg of putty).

After several hours, it went from white to translucent. The big piece was easy to peel off. For masking a piece of your model to prevent it from being painted, it would certainly do the trick. The smaller parts came off easily with some tweezers. No latex was left behind, so no fiddling needed with a sharp knife, as you would have to do if you had used clay or something.

One of the purposes I'll use it for, is shown in the pictures below.


The first two pictures show the axles and road wheels of my M60. If I want to easily paint the tank and wheels, I need to paint them before assembly, but small connections like axles/wheels, antennas, ... usually have a bad bonding when glued AFTER painting. You can scrape away the paint where you want to apply glue, but my current experiment should be able to help as well, and a lot easier. Once I have painted the tank and wheels with all needed details painted, I can just use tweezers to remove the latex and have pristine plastic to glue the wheels in place.


The last picture shows the turret and the mini-turret for the machinegun (whatever its called). To avoid any friction or loose the ability to rotate the turret, I don't want paint in this area. Masking tape is far too big a hassle here, so again I am hoping latex will be the answer.

Conclusion:

  • easily applies with a brush (use an old brush, that isn't used for painting anymore)
  • CLEAN your brush regularly with soapy water, before it dries
  • apply a second coat after 10 minutes, just to be sure
  • it smells rather pungent and is indicated as toxic, so use gloves, maybe a mask (I didn't, but will when handling longer or in bigger quantities) and make sure the room is ventilated.
  • easily removed by hand, with tweezers if necessary
Remaining tests :
  • It's probably not suitable for masking on top of a layer of paint (e.g. when painting multicolour camouflage). I suspect it'll pick up the underlying paint when removed. (Will confirm or deny this later)
    --> Humbrol Maskol is confirmed to be suitable for this and is readily available in stores here.
  • How well can it be used for making a mould? How thick does the layer have to be for a decent mould that will retain it's shape after removal from the original object?

Treasure hunt - Part 4

After unpacking the 3rd box, I realized I had yet to find any of my more "normal" models, i.e. the airplanes I put together before I switched to Scifi. Some more digging in the attic revealed a fourth, smaller box, bringing the total number of models to 44.

B-26 Marauder.

F-82 Twin Mustang, with extra fuel tank.


2 F16's, with a weapon rack containing all left-over armament from various kits.

F-117A "Nighhawk", my very first model ever.

F-15 "Eagle".

F-14A "Tomcat", used mainly on carriers, with  variable-sweep wings for normal flight or landing approach.

YF-22 "Raptor" prototype.

RAF Tornado, also starring variable-sweep wings.

B-2 "Flying wing" stealth bomber

YF-23 "Gray ghost", one of two prototypes. The USAF ultimately went with the YF-22.


Treasure hunt - Part 3

The third box is the largest and contains 15 Star Trek models and 1 rocket. The last remaining ST model was on top of the wardrobe, since it's too big to fit together with the others. (total number of models is now 33).

Klingon Vor'cha class attack cruiser. Together with the Enterprise-D, my first Star Trek models. I don't think I modeled anything non-scifi since, but that should change now. 

Runabout "Rio Grande" from Deep Space 9.

USS Enterprise NCC-1701-B.

Kazon torpedo, used to puncture the hull of a ship, then board it using the forward hatch.

Cardassian Galor class warship.

USS Enterprise, NCC-1701-E, as seen in Star Trek VIII - First contact.

Kazon raider.

Klingon Bird-of-Prey.

Star Trek "Adversary set". Romulan warbird, Klingon mini-Bird-of-Prey and a Ferengi marauder.

USS Defiant.

USS Enterprise, NCC-1701 (the original), with several cut-away sections.

USS Voyager.

Maquis raider, Peregrine class.

USS Enterprise, NCC-1701-D. The saucer can be seperated from the drive section, as seen in the pilot episode of The Next Generation.

Klingon K'Tinga class battlecruiser.

The Deep Space 9 station.

A V2/A4 rocket.

Wednesday 19 September 2012

Treasure hunt - Part 2

Box 2 contained my Star Wars models (and 1 stray Star Trek), bringing the number of uncovered models so far to 16. One box remaining, but I kept the biggest for last.

The infamous Millennium Falcon. 
I got this kit at an airshow and it was my first Star Wars kit. The cut-away section is a very nice detail.

Darth Vader's Tie fighter.

An "AT-AT" (All Terrain Armoured Transport). The box comes with 2 snowspeeders and rebel base turrets, so it's just begging to be put in a diorama. (Would be fairly easy, since it's snow all around).

Luke Skywalker's X-Wing. 
The wings can fold together for hyperspace jumps or as portrayed for attack mode.

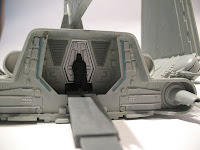
Shuttle Tydirium, used to transport Darth Vader. The "wings" fold up and the cockpit rolls away to make place for the walking plank, with Darth Vader at the door. 
I didn't bother installing the landing gear and doors for the picture.

Imperial star destroyer. Seems I painted this flat grey, so this is one of my old kits begging for a paintjob upgrade.

U.S.S. Reliant, from Star Trek II - The wrath of Khan. The larger decals are discoloured. I don't know if they were like this from the start or became like this over time. Future models shouldn't have this problem, since I plan on coating them all with a clear finishing layer.